
Bra Pattern Drafting Books Review: Shin vs Bra Makers Manual
Today I will be reviewing AND comparing the different drafting methods covered in 2 very popular bra drafting books: Bra Makers Manual by Beverly Johnson and Patternmaking for Underwear Design by Kristina Shin, PhD. This endeavor took several months and involved more than a dozen muslins for 4 volunteers of varying bra sizes.
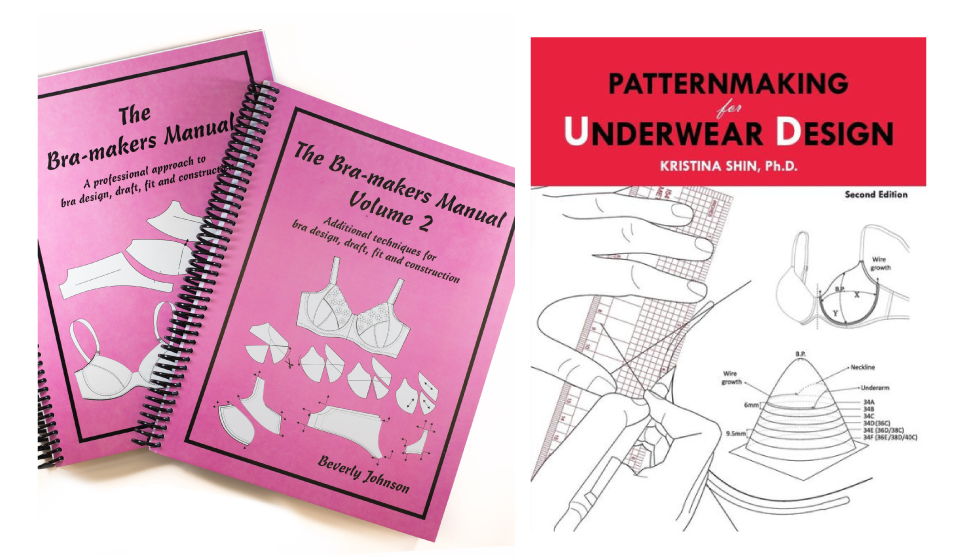
BOOKS
Bra Makers Manual (BMM for short) - This book was initially created as a textbook for Beverly's Students. It is geared toward the home sewer and those interested in custom bra making. Volume 1 covers sewing construction of her Classic Bra as well as fabrics, fitting and alterations. Volume 2 covers pattern drafting, grading, complex fitting techniques, lace and bra foam.
BMM utilizes flat drafting mainly comprising of the "slash and spread" method many home sewers are already accustomed to. The method was developed by Beverly herself and has grown to a full program at Mohowk College in Canada. Illustrations are plentiful and fairly easy to understand. There are 10 measurements required for the draft. You begin by drafting the bridge and band first, then lower cup and upper cup last. I was able to breeze through the band and lower cup drafts but upper cup gave me pause. Took a break and came back to it then everything became clear the next day.
Patternmaking for Underwear Design (PAT for short) - This book was written for people in the industry or will be in the industry (lingerie students, etc). As such, there is no information on construction or alterations. It focuses on clear illustrations, measurements, and charts with little text (relatively speaking). The measurements that accompany the illustrations are appropriate for the industry standard of 34B with a chapter dedicated to grading. It is not difficult to substitute the standard measurements with your own with a few caveats (see below). This book covers how to draft a full scope of lingerie (corsets, underwear, and sleepwear, etc) but this review only refers to the bra drafting aspect.
PAT also utilizes flat drafting but that is where the similarities end. The drafting method utilized in the book was developed by Shin herself and is a modified version of the industry standard, designed to be easier and faster. No scissors or tape needed. There are 3 measurements required for the draft - any additional measurements needed are assumed to be industry standard (like center gore). Much like the BMM version, you begin by drafting the bridge and band first, then lower cup and upper cup last. Drafting was a bit less straightforward because unless you are a 34B, you had to substitute your own measurements for the ones indicated in the book. Its just an extra step.
********************************************
If you are looking for a drafting book for your first foray into bra pattern making, you may stop here. It should be quite clear which book is best suited for that purpose. If you are looking to increase your bra drafting skill set or draft other lingerie or add to your existing library, please read on.
********************************************
PROCESS
There were 4 volunteers for the fitting process. All four were fitted with 2 bras each - one using the BMM method, one using the PAT method. All bras were made of the same materials from the same batch of supplies but completed at different times.
RESULTS
Volunteer #1 - Woman with wide, short root wearing 34B but measured at a 30F. PAT needed: reduce CC seam and widen bottom of center gore. BMM bra needed: reduced curve at cross curve (CC) between front (CF) and bust point (BP), remove a wedge near underarm, move bust point and crease at wireline.
Volunteer #2 - Woman with wide, tall roots measuring at 32E. PAT bra needed: - increase the curve at the lower cup split to accommodate full on bottom (FoB) and increase width of lower center gore. BMM bra needed to remove a small wrinkle at the wireline.
Volunteer #3 - Woman with wide, short roots and hollow chest measuring at 34/E, 36D. PAT needed: reduce CC seam, remove wedge in upper side wing. BMM bra needed: reduced curve at cross curve (CC) between front (CF) and bust point (BP), remove a wedge near underarm.
Volunteer #4 - Woman with wide, tall roots and no space at center gore measuring 38F. PAT bra needed: removed small wedge at neckline. BMM bra needed: insert wedge at neckline, remove wedge in lower cup near wireline and a host of others (took this bra off after 2 seconds as the PAT bra was significantly better).

Volunteer #1 - BMM on top and PAT on bottom.
**CAVEATS - Optional Steps to add
Due to PAT being geared towards industry professionals, all measurements are for a 34B. While easy enough to substitute the inner arc, outer arc and bust height, it in itself is not enough. For those who are FoB or significantly larger than 34B, the curve of the lower cup split must be increased from the 4mm to at least 8mm (for 32F). Exactly how much depends on the individual. This one change alone can make a significant difference in fit. Most other changes that also need to be made for different sizes but can be gleaned from the grading section.
As the book is geared toward the industry, they assume standard gore width - which is great if your anatomy follows the standard. For these of us whose gore deviates from the expected, you have to remember to manually add a step to alter it.
PAT also does not incorporate the upper back measurement like BMM and assumes standard sizing. This means someone with a ribcage shape more like a cylinder vs the expected barrel will find the wire not springing correctly. You may need to increase of decrease the curvature of the band to accommodate this.
The BMM method of calculating the band does not account for the hook and eye. You may want considering adding a step to subtract 2" from the underband length before proceeding with calculations.
BMM also does not give a specific guide as to how big a curve to make when splitting the lower cups. This may be purposeful as the amount of curve needed depends on the individual.
Also consider lining up the various pieces (without seams) to true lines for BMM. Meaning ensuring the seams line up, straightening lines and making sure the curves are smooth across multiple pattern pieces.

BMM on bottom. PAT on top. Green line indicates drafting per directions. Purple line indicates drafting minus 2" hook and eye.
CONCLUSION
In this very short and very unofficial experiment, the results were unanimous. While nearly all of the alterations needed were low in number and fairly easy to accomplish for either method, Kristina Shin's method yielded bras that required fewer alterations overall. Coupled with the possibility of reduced drafting time (nearly 1 hr in industry standards according to her dissertation), it is the clear winner for the professional bra maker.
That said, the learning curve of using Shin's method is fairly steep for a novice and thus not recommended. I found myself supplementing the PAT method with my knowledge from BMM and vice versa as neither method is perfect. Both books are an excellent addition to a patternmaking library and I highly recommend them!