
Sewing Bras - Custom Drafting a Strapless Bra Part 1
I know its been quite a few weeks without any bras - I'm finally ready to give a peek on what I've been working on.
I want/need a long line strapless bra as I do not have any in my current size. I use the term "long line" loosely as the name changes depending on the manufacturer, style, and even era.
To clarify, it is a bra that extends at least to the waist - I am prefer the type that ends at the hips. Like these.
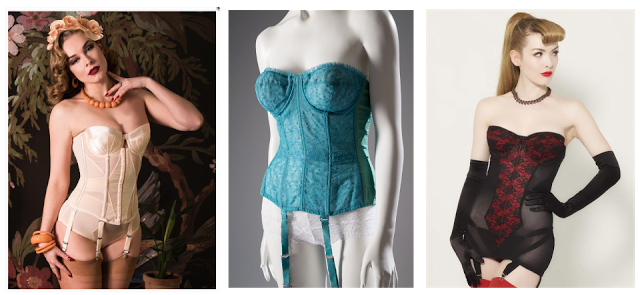
Aren't they gorgeous? [From L to R] What Katie Did Glamour Noueveu, Warner's Merry Widow from 1957 and Cabaret Torsolette
That said, my first FEW attempts were pretty sad. Having made corsets before, I approached drafting the bra similar to corsets. Call it idiocy, call it over confidence, but it didn't occur to me to read over the section on Strapless bras in my favorite bra making book. The results were as one would expect.
#1 - Waist too big. Took a wild guess on % of reduction for the elastic. (I did 5%)
#2 - Fixed waist, cups sagged, wrinkles at the center gore, boobs had zero lift and
#3 - Inserted U-wires. This helped the cups retain some shape better but also were too long for the band.
This lead me to try drafting my own - properly.
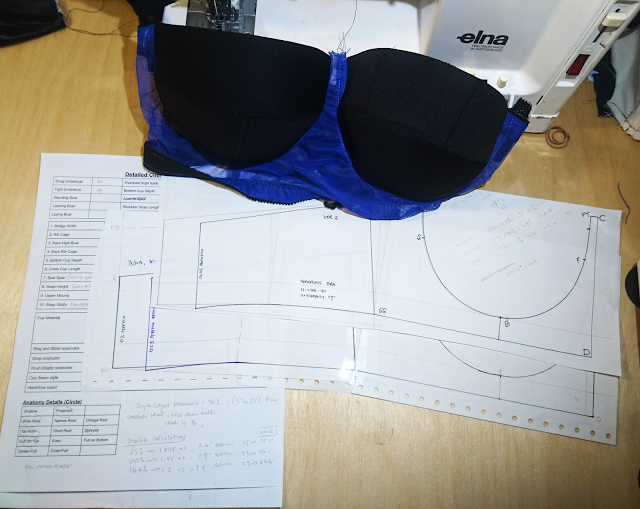
Using the Bra Maker's Manual Vol 2, I was able to follow instructions and draft the band and lower cup without a problem. The upper cup directions was less so. At one point, I contemplated asking my husband to read the passage and see what he came up with. Ultimately, I succeeded on my own by looking at the diagrams and ignoring the directions! Then just needed to repeat all the steps for the other cup. I wasn't sure if it was even necessary as the cross cup measurement were different by half inch. Thinking I could probably use the practice anyway, I went ahead and drafted upper and lower cups for each breast. Its interesting to note the differences in pattern shape and size based on a difference of 1/2 inch! It took me 2 days but drafts are done! Not too bad as I was attempting this with my littles running around high on life.
Not wanting to COMPLETELY start over and waste perfectly good materials, I decided to sew up the bridge of my new self draft and OVERLAY it onto my in-progress strapless bra. On the same wavelength, I had hoped to reuse the bra cups, cut according the new pattern and re-insert. As expected, more issues arised.
#4 - cups are comically huge and pointy, wires do not spring (I do think this may be due to the elastics not being completely sewn on?)
It seems my NEW problems stem from measuring! Perhaps this is why they don't recommend working late into the night! That and my particular body type doesn't yield a visible IMF near the arm. No amount of poking or prodding could produce a semblance of a fold to measure the cross cup seam. In the end, I had to wear a bra and measure based on the indention the wire created when I took it off. Or just measure over a bra (not an option for those with my body type AND no well fitting bra!)
So after remeasuring, re-drafting and pattern creating, I test out my custom bra cup pattern ver 2.
#5 - cups are MUCH closer to being a real fit, but still pointy
#6 - cups are no longer pointy but tilt downward toward the armpit despite ensuring marks on the cup lined up with the marks on the cradle.
In order to address the tilt issue, I decide I MIGHT need to actually make a full strapless bra based on the pattern I drafted. Thus, I take the cups out of the strapless long line, sew up the band of my custom draft and throw it on. Another COMICAL situation.
#7 - bra band is ridiculously huge. It measured 30" unstretched - and that included a 12.5% negative ease for the elastic (which incidentally, I apparently pickup that percentage out of nowhere).
This maybe more of a personal preference than mistake. My underbust measures 29" tight and 30" snug. Evidently I am accustomed to wearing my bra bands pretty tight. Perhaps it was from my years of wearing Victorian Corsets (off and on) for years. This was evident when I measured my underbust again - this time, while wearing a bra - and measured 29". [***Details Below ***]. Cue more drafting.
Aaaaand this is where I currently stand. Three days of proper bra drafting, testing, redrafting and more testing (not including the days where I worked on the Strapless Longline/merry widow/bustier even before cracking open my books!). Currently on version 2 of the band, version 4 of the cups, and version 2 of the merry widow. We will see what the next few days bring. Thank goodness for water soluable thread!
----------------------------------------------------------------------------------------------------
*****For those who may also run into this type of problem on their first foray into custom bra drafting, I took note of the finished (unstretched) band lengths of my RTW bras for comparison. My best fitting bras all had a 32 band that physically measured approximately 26.5" unstretched. With the 26.5" as a reference, I still had to decide the % of negative ease for the elastics. This percentage is dependent on the stretch factor of the fabric used for the back band. In my case, a single layer of powernet had 50% stretch (5" stretched to 7.5"). The Bra-Makers Manual says to reduce no more than 1/2 and ideally only 1/3 of the length (or anything within that range). So I do a few quick calculations to get some comparisons based on my 7.7" pattern piece.
25% reduction (1/2 of 50% stretch) = 1.81" x 2 (wings) = 3.6" => 25.4" total length
16.6% reduction (1/3 of 50% stretch) = 1.2" x 2 (wings) = 2.4" => 26.6" total length
And just out of morbid curiosity, how much I would have needed to stretch on Ver 1 of my pattern with 7.75" piece:
25% reduction (1/2 of 50% stretch) = 1.94" x 2 (wings) = 3.875" => 26.125" total length
16.6% reduction (1/3 of 50% stretch) = 1.29" x 2 (wings) = 2.6" => 27.4" total length
These numbers confirm what I have suspected for a while. The smaller the band size, the less "squish" one has to tolerate a firm band. This is due to the smaller bands having less fabric and thus less stretch. You can easily test this theory by stretching a piece of 5" elastic (or powernet) to its max. Then repeat with a piece of the SAME elastic that is only 2.5".