
Breast Anatomy in Relation to Fit
Check out the entire Consider Making your Own Bra Series
Part 1 - Cost, Time, Need and Difficulty
Part 3 - Choose a Bra Pattern
Part 4 - Alterations/Additions to Consider
As I debated what topics to cover for part 2, I decided to focus on the topics not often discussed. There are numerous tutorials on bra construction [like this Video Sew-Along, Wireless Bra Sew-Along and Wired Bra Sew-Along] and bra fabrics [link HERE and HERE] on the internet.
For those considering bra making, the task of finding a bra pattern can be daunting. There are more options now than ever before. While those of us with bra making experience celebrate the choices, we understand it can be overwhelming for someone new.
However, before we can begin choosing a pattern, it may be prudent to discuss breast anatomy and how our very individual needs may shape our bra making experiences. For those who already have a bra pattern, being familiar with your breast anatomy can be helpful in knowing what alterations to consider.
Breast Anatomy in Relation to Bra Fit
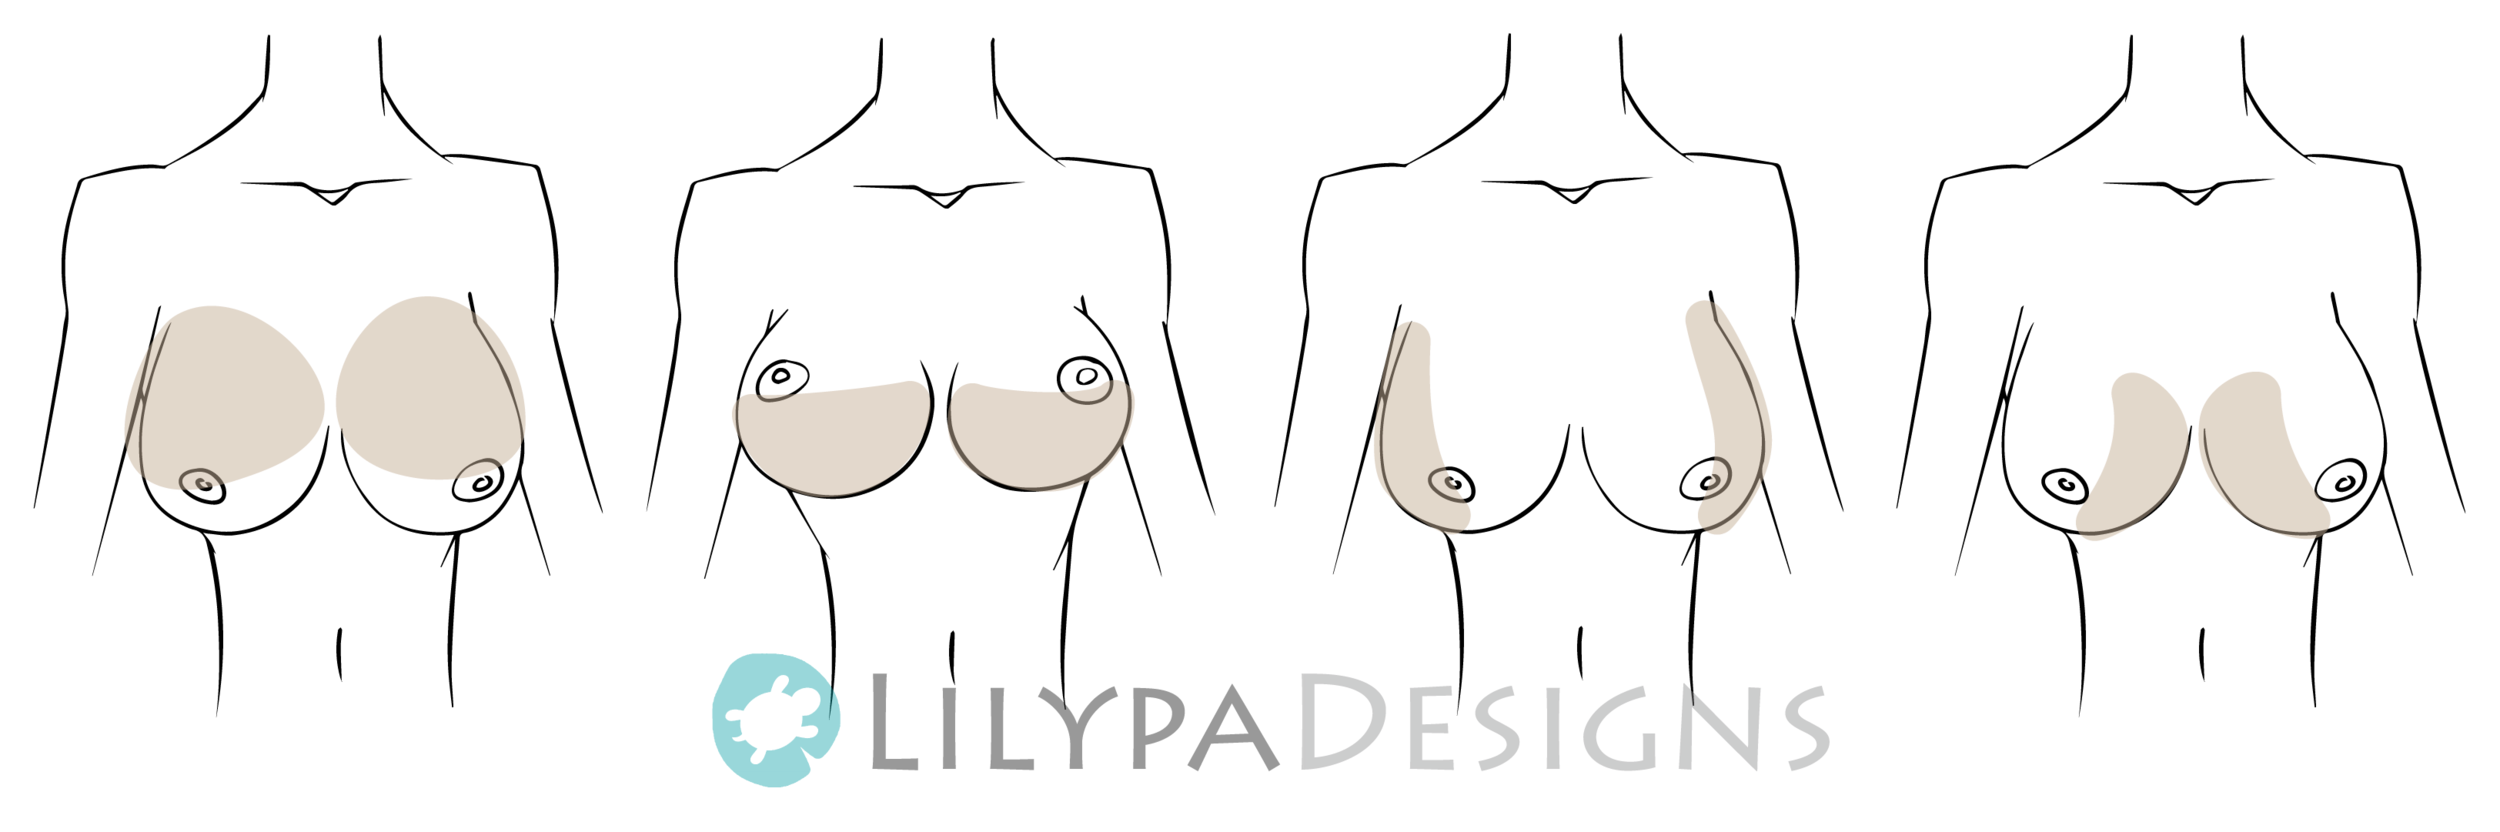
Overall Breast Shape
The overall breast shape would be the silhouette of the naked breast if you will. While the volume of the breast between 2 women with D cups (with the same band) is the same, the way that fullness is distributed may be different. One woman may be fuller in the center the other could be fuller on the bottom. The easiest way to determine shape would be to lean over at a 90 degree angle (or whatever angle you can manage) in a mirror. Does the breast:
Look like a long "V" shape?
Look like a tear drop shape?
Look like a ski slope (when standing up)?
Look like its about the same width and length?
Look like there is more boob on top? On Bottom? In the Middle?
**Note this method may not work well for someone with VERY soft tissue or pendulous breasts. Try supporting the naked breast from below.
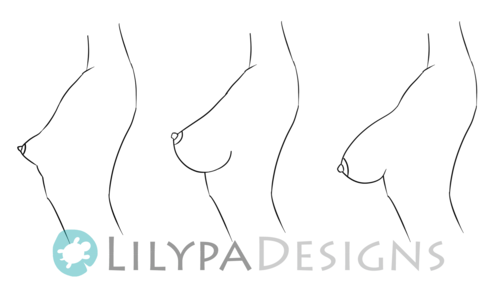
Long tubular breasts (sometimes called bazooka or torpedo boobs) can indicate very projected breasts and may need more forward volume while maintaining the same wire and band. See our post about Projected and Omega Breasts. One popular option would be to increase the cup size to get the necessary depth then take in the sides. Another would be to split the bottom cups or if already split, to increase the curvature. Yet another is to split the upper cup and increase the curvature there.
Shallow shaped breasts (ski slope shaped) can indicate breasts that stay close to the chest and may need a projection reduction alteration while maintaining wire size.

Omega shaped breasts (tear drop shaped) can indicate the need for smaller underwire size when compared to breast volume. It may be necessary to add tiny darts (1/2" or so) or small gathers to the cups in order to make it fit in the smaller wire size band.
Center-full breasts (inner full) can indicate breasts that there is more volume near the center of the chest (sternum) than the "average". Those who are center full may find creating a touching cleavage effortless or "spill out" of bras near the center gore (but not anywhere else can consider adding more fabric (by inserting a wedge on the pattern) at the neckline between bust point and center front.
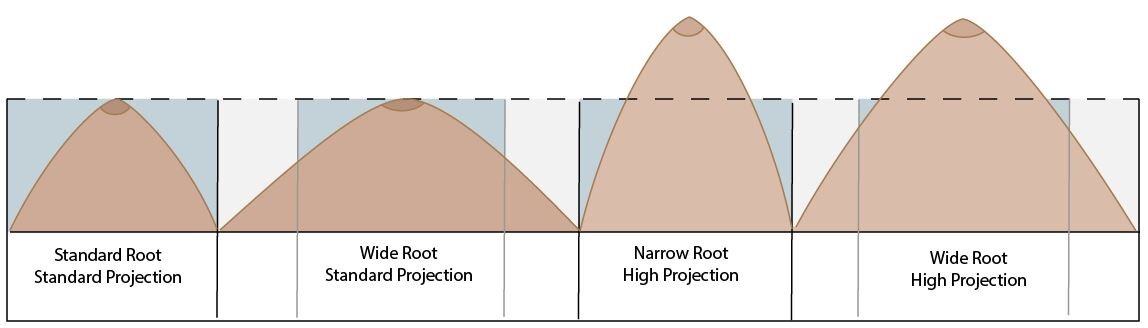
Projection
Projection is how MUCH or how FAR your breasts sticks out from the chest.
Breast Root
The breast root is the area where the breast attaches to the chest. In retail, RTW companies assume that the breast projection and breast width (root) are the same. As individuals, this is often not the case.
Breast projects out MORE than the width
Breast projects out LESS than the width
Breast is TALLER than the width
Breast is SHORTER than the width
A breast that projects MORE than the width (AKA Projected Breast) may have the odd sensation of a bra feeling both too big and too small at the same time. There may be wrinkles immediately above the wires while feeling a bit tight near the bust point.

A breast that projects out LESS than the width (AKA Shallow Breast) may fit well in the band and wires but gapping (or empty) space in the upper portion of the bra.
A breast that is TALLER than the width (AKA Tall Roots) may fit well in the band, wires and the cups but the neckline edge cuts into breast tissue.
A breast that is SHORTER than the width (AKA Short Roots) may fit well in the band, wires and cups but the height of the cups, straps and or neckline is too high on the chest.
Breast Crease
The breast crease or Inframammary Fold (IMF) is the fold where an underwire typically sits. Underwires come in different shapes, widths, curves and wire gauges to accommodate different shaped breast creases and breast densities. A few of the commonly used underwire types are daywear, vertical and plunge. There are also mono wires (single wire for both breasts), strapless wires (U-shape), over wires (above the breast), and flex wires (minimizer bras).
A common source of pain along the breast crease is a mis-match between the breast root crease shape and the underwire shape and/or size. In general, a narrow breast root needs a vertical wire and a wide breast root needs a daywear (regular). The ideal underwire will follow along the IMF - this produces the most comfort and support.
Breast Orientation
The bust point of the breast can point forward (like RTW assumes) or it can point outward or inward. In general, the closer the bust points look in bra, the more youthful the breasts look. A variety of methods can be used to make the bust point look more centered. Built in Powerbars, Internal Slings and padded inserts are fairly common.

********** This is meant as a general introduction to SOME breast anatomy terms that may affect fit and not a comprehensive list. **********
A few additional terms not covered here include: Inner Fullness, Breast Rotation and Torso Shape (which directly affect bra fit).
Also check out our Bra Maker’s Fit Challenges for fit issues that are harder to spot and fix.
Check out Part 3 in our series - where we discuss how to choose a pattern!