
Bra Fitting Band
I've mentioned the benefits of a bra fitting band a few times before but thought it was time for me to write a tutorial on how to create one!
What is a Bra Fitting Band?
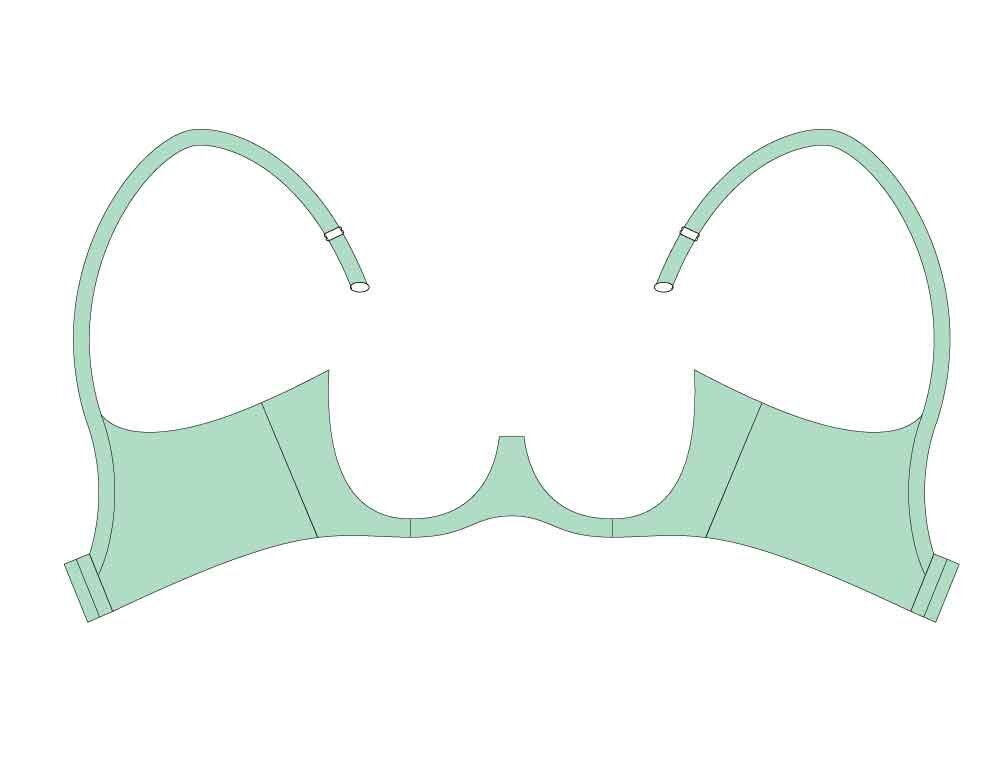
Quite simply, a bra fitting band is a underwired bra without cups! It allows one to see the fit of the band and most importantly the center gore unencumbered by the cups. It can help you determine a well fitting underwire (or confirm it) as well as see common bridge issues such as center gore too wide on top and/or too narrow on the bottom. In some cases, it can also help diagnose torso based fitting issues such as pectus carinatum or flared ribs. A fitting band ALSO makes the process of fitting the bra cups easier as you can just baste on a tester cup without having to make an entire bra. It also speeds up fitting using the process of elimination. (ie. I know the wrinkling is not caused by the band/wires, etc so it has to the cups).
****Flexwires DO NOT WORK in Fitting Bands****
For those with Omega shaped breasts [see breast anatomy primer HERE], I HIGHLY recommend making a fitting band as it may take a few tries to get the right sized cups then to get the cups to fit the band. Makes the fitting process easier and dare I say, less headache.

Materials Needed
Materials required for a fitting band is the same as a regular underwired bra - namely:
Bra pattern
Underwire (any type except flex wires)
Fabric for cups and cradle w/ same stretch % as indicated on pattern
Powernet or Techsheen w/ same stretch % as indicated on pattern
Hook and eye
Plush elastics (top and bottom band) w/ same stretch % as indicated on pattern
Strap elastic
Step 1. Cut out fabrics as usual (with exception of cups)
Step 2. Sew cradle and band pieces together.
Step 3. Sew on plush elastic (top and bottom).
Step 4. Sew on underwire channeling 1/4" (~6mm) away from edge. There are a few ways to do this - you can baste (by hand or machine) 1/4" away from edge or use a fabric marker/pencil/chacoliner to draw the seam allowance on the fabric. This give you something to line up the edge of your channeling against when sewing. Keep the ends of the channeling open so you can slide the wires in/out. One less thing to worry about when basting on cups.
Step 5. Sew the second pass of the channeling on the opposite edge in the same manner.
Step 6. Insert wire of choice and try it on!
OPTIONAL
Keep the ends of the channeling long so you can accommodate different length wires.
Sew the wire channeling to the outside of the frame. Easier access and possible to swap out wires without removing the bra.
Sew a G-Hook to the channeling so you can hook your strap to the bra without tester cups.
Step 5: Sew on strap and hook & eye. Leave the front ends of the straps hanging - this allows you to pin the straps to any tester cups you may want to baste on.
BONUS
One additional reason I love a good fitting band is the ability to quickly baste on tester cups. A well perfectly fitting, err, fitting band allows you try out different cup alterations without sewing up an entire bra. Combine this with some wash-away-thread and its possible to try out 4-5 different cups in one afternoon!

Fitting Band - Alternate Method
I also want to mention a faster and easier way of creating a fitting band using an old bra. For those of us who have been on our me-made bra (or for a lucky few, RTW bras) making journey for a while, we may have bras we completed and fit well in the bridge/band but not in the cups. You can simply cut off the cups approximately 1/2" (1.2 cm) above the wireline. All that is left is to open the underwire channeling (so you can remove the wires while basting on tester cups).